Wednesday 29 February 2012

Space Nails Tutorial

Hey everyone, just a quick message before the tutorial, THANKYOU so much for following us! Paloma and I have been grinning like cheshire cats for the past couple of days so thankyou :) xx Enjoy

Step 1) Paint a dark base coat. I used a sparkly purple but you could use black, green or blue (someting that symbolises the night sky).
 
Step 2) With a sponge or a eyeshadow stick (with the sponge on the end), add some blue to the centre of your nail.


Step 3) Layer up your colours. I've used  some green (all over the nail), some pink (at the tip and base) and some yellow (at the base).

Step 4) Add some white to the tips of your nails and with a white nail art pen, or a toothpick, dot some blobs to look like stars (make sure they are quite small). Then glaze your nails with a glitter topcoat, adding to the galaxy effect.
 
Finito! Space nails in rocket speed (do you see what i did there :)).  Believe me they sparkle in the light, just like stars...ok i'm being cheesy. Good luck! xxx


Sunday 26 February 2012

The Cupcake Post

Hey! So this is what all our work's been for. Just had a whole session of baking cupcakes, which was so much fun :) We go through the recipe and decorating step-by-step, so don't be afraid to try it xx

 Ingredients:160g caster Sugar
160g Butter or Margarine
3 Medium Eggs
160g Self Raising Flour
1 Teaspoon on Vanilla Extract
20 Cupcake Cases
Frosting:110g of Butter or Margarine
340g of Icing Sugar
Squeeze of Lemon Juice (if required)

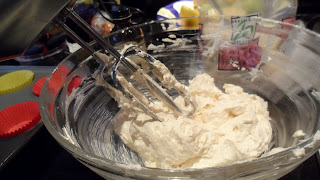
Preheat the oven to 180*C/350*F/Gas 4. Cream the Butter and Sugar in a bowl until pale and fluffy (you could use an electric whisk or a spoon).

In a separate bowl, whisk the eggs and the vanilla extract. Add to the mixture bit by bit.

Sift in your Flour a little at a time, folding in between. Try no to knock any of the air out, a spatula is best for this.


Next, spoon your mixture into the cupcake cases. They should be about 3/4 full, try to make them as neat as you can. Bake in the oven for 15-20 mins, or until golden on top and the cakes spring back when touched.
 
Put the cakes on a wire rack to cool. Now make the icing. Put your softened butter or margarine in a bowl and add the icing bit by bit while mixing with a tablespoon/ wooden spoon. If the mixture is too tough, add a little lemon juice. If the mixture is too runny, add some more icing sugar. Then, separate the mixture into smaller bowls and add the food colouring.

Put your piping bag (with your chosen nozzle) into a glass and spoon your coloured frosting into to bag. push the icing to the bottom of the bag and twist to sercure. Now it's down to you to be creative and have fun piping your chosen patterns :)

This step is optional. Paloma bought this beautiful pink edible glitter from a newly opened cake shop near her house. Its quite expensive, 3 pounds for a tiny pot, so we used it sparingly. Dust a little on each cake to add some sparkle :)

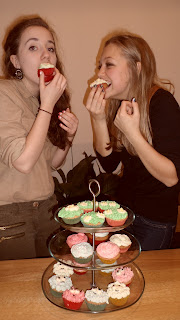
The finished product! After slaving away for what seemed like hours, our cupcakes were done :)


We made A Garden Full of Dasies...


...Traditional Swirls...

...and Little Monsters...
  
...and they tasted epic :)


So, what do you think? We were over the moon that the cakes worked out because our last attempt (the challenging Macaroons) was a massive fail. Thankyou all for following and feel free to leave comments and tips :) xxx

Saturday 25 February 2012

Sunny Days...


Hey everyone! Thanks for following :) I went round Jess's today to do some baking for our next post, and it was such a nice day and the sun was shining so we decided to take some quick snaps of what we wearing :) xx

Me (Paloma)
Shirt- Charity shop in Kensingston
Jeans- River Island
Loafers- River Island
Locket- Vintage
Earrings- Primark
Bag- Primark

Jess
Shirt (worn under cardigan)- Primark
Cardigan- H&M
Belt- Dorothy Perkins
Jeans- GAP
Boots- F&F at Tesco
Bag- Primark
Earrings- Jess's Grandma :)

Bloglovin


Hey all, we are now on Bloglovin! Please follow us there :) Baking post is coming soon xxx

<a href="
http://www.bloglovin.com/blog/3516182/cos-its-the-bees-knees?claim=uybwm647s5y">Follow my blog with Bloglovin</a> xxx

Sunday 19 February 2012

Jean Shrimpton/ Twiggy 60's Inspired Photoshoot


Hey guys, this is our first fashion post!
In this shoot we were just having a laugh and dressing up as 60's mods. We spent ages on make-up and hair, and couldn't get any serious shots due to constant laughter :). We love the fashion of sixties icons, in particular Jean Shrimpton and Twiggy, so we tried to recreate their key looks in the shoot.

The nail art featured in the shoot is from the tutorial of our previous post. xx


Jess (Model)
Chiffon Blouse, new look
Cardigan, F&F at Tesco
Skirt, Primark
Socks, M&S
Earrings- Primark

Paloma (Photographer)-
Jumper- vintage
Earrings- Topshop


Saturday 18 February 2012

Tuxedo Nail Art - Zooey Deschanel style


Nail Art Tutorial
After seeing Zooey Deschanel's nail art at the golden globe awards
we were inspired to create our own tutorial for amzing tuxedo nail art.
here are our step-by-step stages


 Stage 1) Paint two even coats of white nail polish - preferably chip-resistant.


 Stage2) When completely dry, paint the tips of the nail using a black
nail art pen.


 Stage3) Now draw the bow ties. An easy way to start do this is by putting a dot
where you want the bow, and then drawing two 'even' triangles on either side.


Stage4 ) Probably the easiest stage, dot three blobs of black nail art pen
inbetween the tip and the bow tie - make them of equal distance apart.


Stage5) Paint your nails with a clear top coat to make them shine
and last for longer.


...And you're done! Easy as that, Zooey Deschanel style nails in 5 easy steps. Hope you enjoyed   x

Welcome blog viewers :)


Hello!

Hey and welcome to our blog ...cos it's the bees knees. We are two best friends living in London, interested in fashion, baking and everything that comes with it! Thanks for checking out the blog, enjoy! Look out for an upcoming tutorial for nail art and a 60's inspired fashion shoot xxx